推送通知在主流浏览器中得到支持,并且它们在去年添加到 iOS 后,成为了网络的一个引人注目的集成功能。我们最近构建了一个名为 Robert’s App 的可安装网络应用程序,它具有推送通知功能(阅读 iOS 安装指南 来测试它)。
我们使用 remix.run 构建了应用程序,并使用服务工作者、web-push npm 包(它封装了 Web 推送 API)以及服务工作者注册的 showNotification API 来实现通知。
这个 Web 推送实现是从一些 2015 年的 Google Chrome 开发者关系博客帖子 和 MDN 中拼凑而成的。
更新: 自从编写本文以来,remix-pwa 项目的新版本已经发布,它为在 Remix 应用程序中进行 Web 推送提供了一套很棒的 API。即使您使用的是 Remix,甚至不是,这篇帖子仍然有助于作为从头开始构建 Web 推送系统的演练,因为您将使用 Remix 作为参考。
当我在实现时,除了“您的后端逻辑在这里”之外,我没有找到很多关于如何实现推送服务器的文档,因此我想记录一个全栈实现。后端订阅管理和架构是过程中特别令人困惑的部分,所以我将花一些时间在本文的开头讨论订阅架构。
如果您像我开始时一样对 Web 推送感到困惑,一个关键的了解点是您的 Web 推送实现将向第三方服务器发送 ping 信号,该服务器由 Apple、Google、Microsoft、Mozilla 或您的服务工作者安装的浏览器供应商维护。
正如 Web 推送文档所指出的,当您实现订阅功能时,实现退订功能非常重要。这不仅提供了更好的用户体验,而且正如我在实现过程中发现的,这也通过确保您的应用程序不会尝试向幽灵订阅推送来防止错误。这不仅仅是一个好功能,实际上是必需的。前端和后端的订阅管理,包括退订功能在这里进行了介绍。
这个演练提供了在 remix.run 应用程序中实现推送通知的完整过程。如果您按照演练进行到最后,您将拥有一个工作的推送通知。
关于隐私的说明
推送通知在传输过程中是加密的,但是推送通知服务的集中式架构使得浏览器公司运营的中介服务器可以读取您的推送通知的内容。在决定通过推送发送什么类型的数据时,请记住这一点。唯一的防止方法是在应用程序中添加一个额外的端到端加密层,该层在发送前对推送通知进行加密,并在接收后进行解密。这超出了本文的范围。
总体架构
这个 Web 推送实现使用两个路由、一个服务工作者、一个推送服务器、一些实用程序函数和一个存储订阅的数据库来工作。
- 设置路由 - 包含订阅和退订 UI 的路由。
- 订阅路由 - 包含可以从设置路由发布的端点的路由。
- 推送服务器 - 一个服务器实用程序,它使用有关您的应用程序的详细信息(例如向谁发送推送)来包装 Web 推送库。
- 服务工作者 - 在首次加载时注册的 JavaScript 工作者,包含绑定到各种安装和推送生命周期事件的事件。
- 客户端实用程序 - 服务工作者注册和推送订阅的客户端实用程序集合。
这是在下面的架构图中展示的:
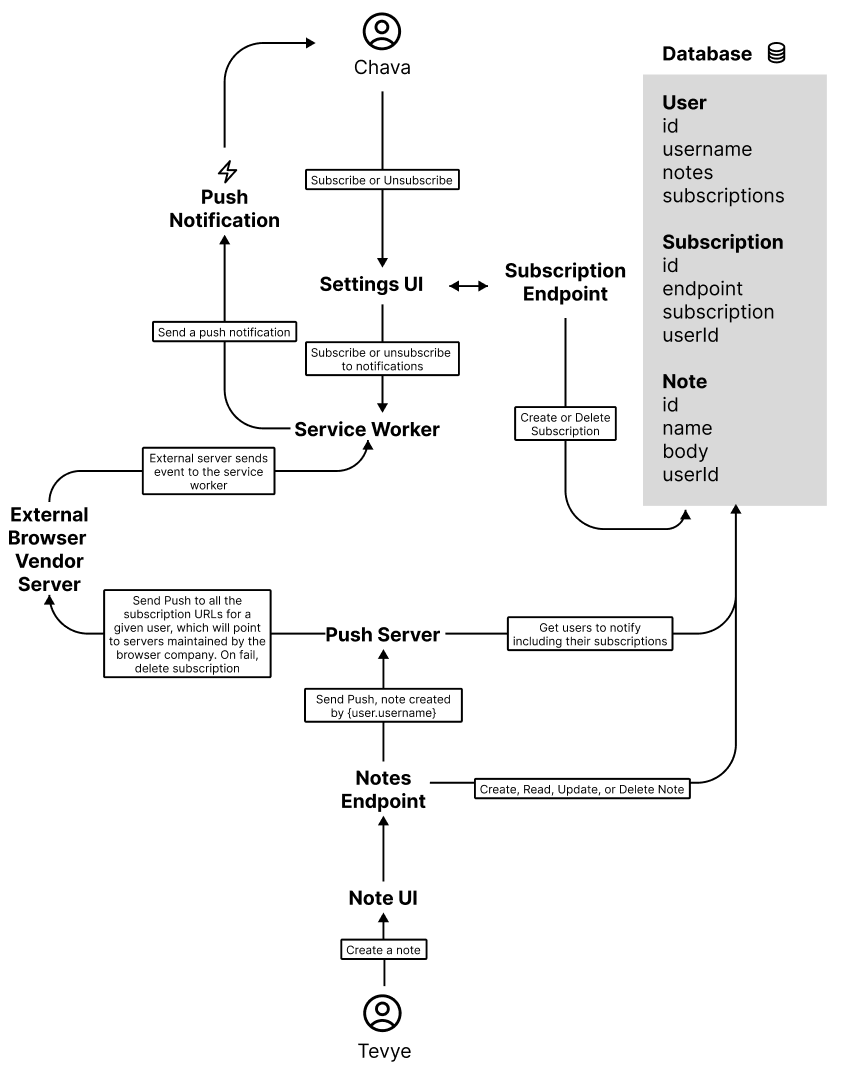
我们的实现包含的比这多一点,用于集成到 remix 中,但这种架构可以跨其他框架和堆栈重用,因为它是 Web 平台代码。
Remix 设置
这个演练使用 web-push npm 包为从 remix indie stack 创建的 remix.run 应用程序添加推送通知。这对任何想要在 remix 应用程序中添加推送的人来说都是很棒的,尽管概念将继续适用于其他全栈应用程序环境。这个演练中几乎没有“remix 代码”。 Remix 在这里主要处理路由和构建。
如果这是您第一次使用 remix,请阅读更多关于我们喜欢 Bocoup 的 Remix.run 的信息。
要按照这个演练进行操作,请使用 create-remix 创建一个 remix 应用程序。
npx npx create-remix@latest --template remix-run/indie-stack
本教程是使用 create-remix@2.7.2 编写的。如果您遇到错误,请尝试重新开始 *npx create-remix@2.7.2 –template remix-run/indie-stack。 Remix 在向后兼容方面做得很好,所以这个演练应该在这个版本上继续有效很长时间。我在本地机器上使用 node v20.5.0 实现了这个演练中的所有内容,以防您在实现中寻找错误。
一旦您运行了 create-remix,您将有一个新项目可以工作。在您喜欢的文本编辑器中打开该项目。从这里开始,我们将添加或更改以下文件:
├── app/
│   ├── models/
│   │   ├── subscription.server.ts // 新文件
│   │   ├── note.server.ts
│   │   └── user.server.ts
│   ├── routes/
│   │   ├── manifest[.]webmanifest.ts // 新文件
│   │   ├── push.ts // 新文件
│   │   ├── settings.tsx // 新文件
│   │   └── push.server.ts // 新文件
│   ├── entry.client.tsx
│   ├── entry.worker.ts // 新文件
│   ├── root.tsx
│   └── utils.ts
├── .env
├── package.json
└── prisma/
    ├── schema.prisma
    └── seed.ts
我们有两个包需要为这个演练安装:
npm install –save web-push heroicons
Web-push 将作为命令行工具生成我们的一次性密钥,并且作为我们在浏览器中与推送 API 交互的运行时库。 Heroicons 将为我们的 UI 提供图标,以向使用我们软件的人传达正在发生的事情。如果您愿意,您也可以选择其他图标库。
接下来,我们将使用 web-push 包生成我们的公钥/私钥,并将它们存储在我们的 env 文件中。这是一次性操作,尽管我们稍后将在应用程序运行时使用 web-push 来使用这些密钥进行消费和操作。 Web 推送协议使用所谓的 自愿应用程序服务器识别 (VAPID) 密钥。
npx web-push generate-vapid-keys
将该命令的输出存储在您的 .env 文件中,以及我们将用于确定用户点击通知时打开的链接的 DEFAULT_URL 变量:
DATABASE_URL="file:./data.db?connection_limit=1"
SESSION_SECRET="super-duper-s3cret"
DEFAULT_URL="http://example.com"
VAPID_PUBLIC_KEY="paste-your-vapid-public-key-here"
VAPID_PRIVATE_KEY="paste-your-vapid-private-key-here"
后端
让我们从后端开始,因为这是 Web 推送中最少被描述的部分。
prisma/schema.prisma
首先,我们需要一些模式来存储用户的订阅。我们使用的 remix 模板集成了 prisma,所以我们将编写一个 prisma schema。
我们需要向 remix 模板附带的 schema.prisma 文件中添加一个 Subscription 模型。
订阅是来自浏览器中用户订阅的服务工作者注册 pushManager.subscribe 方法返回的签名端点。它看起来像这样:
{
  "endpoint":"https://web.push.apple.com/a-secret",
  "keys":{
    "p256dh":"a-secret",
    "auth":"a-secret"
  }
}
您可以使用我们之前设置的相应的 vapid 密钥,使用 web-push npm 包 ping 这个端点。向这个端点发送 ping 将向服务工作者(我们将在后面讨论)发送一个推送事件,我们将在服务工作者中绑定它,然后使用 Web 平台的 showNotification API 发送系统通知。
但我有点超前了。让我们从向我们的 schema 添加一个订阅模型开始,它可以存储。您会注意到,我们已经从订阅对象中分离出了 endpoint 属性。我们将在稍后使用它作为在某人使用我们的软件退订时删除订阅的键,或者当我们发现订阅不再工作时。
model User {
  …
  subscriptions Subscription[]
}

model Subscription {
  id           String   @id @default(cuid())
  createdAt    DateTime @default(now())
  updatedAt    DateTime @default(now()) @updatedAt
  endpoint     String
  subscription String
  userId       String
  user         User     @relation(fields: [userId], references: [id], onDelete: Cascade)

  @@unique([userId, endpoint])
}
prisma/seed.ts
接下来,我建议在您的种子脚本中添加第二个用户,这样当完成时,您可以在两个帐户之间测试所有内容。
  await prisma.user.create({
    data: {
      email: "boaz@bocoup.com",
      password: {
        create: {
          hash: hashedPassword,
        },
      },
    },
  });
app/models/subscription.server.ts
现在,让我们创建一个订阅模型来创建、读取和删除订阅。我们将使用它来管理应用程序中的订阅生命周期。
import { prisma } from "~/db.server";

export function getSubscription({ id }: { id: string }) {
  return prisma.subscription.findUnique({
    where: {
      id,
    },
  });
}

export async function createSubscription({
  userId,
  subscription,
}: {
  userId: string;
  subscription: PushSubscription;
}) {
  return await prisma.subscription.create({
    data: {
      endpoint: subscription.endpoint,
      userId,
      subscription: JSON.stringify(subscription),
    },
  });
}

export function deleteSubscription({
  userId,
  endpoint,
}: {
  userId: string;
  endpoint: string;
}) {
  return prisma.subscription.deleteMany({
    where: {
      userId,
      endpoint,
    },
  });
}
app/models/note.server.ts
让我们修改我们的笔记模型,以便在稍后步骤中实现的实用程序 API 中触发推送。
export async function createNote({ name, body, userId }: entityProps) {
  const note = await prisma.note.create({
    data: {
      name,
      body,
      userId,
    },
  });

  if (note) {
    sendPush({ note });
  }

  return note;
}
app/models/user.server.ts
然后,让我们更新我们的用户模型,添加一个函数,让我们获取所有其他用户,而不是做笔记的人,这样当软件中的某个人创建笔记时,我们可以通知应用程序中的所有其他人。
export async function getOtherUsers(id: string) {
  return prisma.user.findMany({
    where: {
      id: {
        not: id
      }
    },
    include: {
      subscriptions: true,
    },
  });
}
app/push.server.ts
最后,在 ~服务器~ 端,让我们制作我们的推送发送 API,我们在上述代码中调用它来创建笔记。应用程序的任何部分都可以使用这个来从服务器运行时发送推送。
这个实用程序包含获取刚创建的笔记,获取系统中除作者之外的所有其他用户,从笔记标题和正文格式化通知,尝试将该通知推送到系统中所有其他用户的所有订阅,然后删除所有失败的订阅。最后一个步骤是关键。您不希望幽灵订阅在您的数据库中挂着。这是浪费您的计算资源,以及浏览器供应商的计算资源。
这是一个有点简化的实现。在您的应用程序中,您可能不应该在每次发生某事时通知所有用户。最好有细粒度的设置,并且只通知有关特定活动的人,他们出于特定原因订阅了。
import { Note, User } from "@prisma/client";
import webpush from "web-push";

import { deleteSubscription } from "./models/subscription.server";
import { getUserById, getOtherUsers } from "./models/user.server";
import { getDomain } from "./utils";

export async function sendPush({
  note,
}: {
  note: Note;
}) {
  webpush.setVapidDetails(
    "https://example.com",
    "BDXxzSsmZeHrm4_sqzQcX2lGBscHAiIP4rO0E1vPmkZbuZBnmCDhwSjJETCpz8Zu4FAkWVndaaqGkfyQQhvuHoQ",
    "ElEUz38EFtDmUXcb1fWK9Tb1deRZJH3rJRqVnkosI6I",
  );

  const actor = (await getUserById(note.userId)) as User;
  const otherUsers = await getOtherUsers(actor.id);
  otherUsers.forEach(async (personToNotify) => {
    if (personToNotify.id === actor.id) {
      return;
    }

    personToNotify.subscriptions.forEach((subscription) => {
      const payload = JSON.stringify({
        title: `New note: ${note.title}`,
        body: `${note.body.substr(0, 36)}...`,
        url: `${getDomain()}/note/${note.id}`,
      });

      webpush
        .sendNotification(JSON.parse(subscription.subscription), payload, {
          vapidDetails: {
            subject: "https://example.com",
            publicKey: "BDXxzSsmZeHrm4_sqzQcX2lGBscHAiIP4rO0E1vPmkZbuZBnmCDhwSjJETCpz8Zu4FAkWVndaaqGkfyQQhvuHoQ",
            privateKey: "ElEUz38EFtDmUXcb1fWK9Tb1deRZJH3rJRqVnkosI6I",
          },
        })
        .catch(async function () {
          // 如果订阅没有让我们发送通知
          // 删除它,这样我们就不会尝试再次 ping 它。
          await deleteSubscription({
            userId: note.userId,
            endpoint: subscription.endpoint,
          });
        });
    });
  });
}
前端
app/entry.worker
终于到了添加我们的服务工作者的时候了!这是将被安装在应用程序用户浏览器中的文件,并在后台运行。服务工作者将绑定到 install、activate、push 和 notificationClick 事件,并执行我们需要完成的工作。特别是 push 事件,将使用 Web 平台内置的通知 API 显示我们的通知,而 notificationClick 事件将打开浏览器并将其带到我们在上述 sendPush 实用程序中指定的链接。
// entry.worker.ts
/// <reference lib="WebWorker" />

export type {};
declare let self: ServiceWorkerGlobalScope;

self.addEventListener("install", (e: ExtendableEvent) => {
  e.waitUntil(self.skipWaiting());
});

self.addEventListener("activate", (e: ExtendableEvent) => {
  e.waitUntil(self.clients.claim());
});

self.addEventListener("push", (e) => {
  const message = e.data?.json();
  self.registration.showNotification("Bocoup Example App", {
    body: message.body,
    icon: "/apple-touch-icon.png",
    image: "/apple-touch-icon.png",
    badge: "/apple-touch-icon.png",
    data: {
      url: message.url,
    },
  });
});

self.addEventListener("notificationclick", (e) => {
  const urlToOpen = new URL(e.notification.data.url, self.location.origin).href;

  const promiseChain = self.clients
    .matchAll({
      type: "window",
      includeUncontrolled: true,
    })
    .then((windowClients) => {
      let matchingClient;

      for (const windowClient of windowClients) {
        if (windowClient.url === urlToOpen) {
          matchingClient = windowClient;
          break;
        }
      }

      if (matchingClient) {
        return matchingClient.focus();
      } else {
        return self.clients.openWindow(urlToOpen);
      }
    });

  e.waitUntil(promiseChain);
});
package.json
一旦您添加了服务工作者,您需要使用两个额外的构建脚本更新您的 package.json:
  "scripts": {
    …
    "build:worker": "esbuild ./app/entry.worker.ts --outfile=./public/entry.worker.js --minify --bundle --format=esm --define:process.env.NODE_ENV='\"production\"'",
    "dev:worker": "esbuild ./app/entry.worker.ts --outfile=./public/entry.worker.js --bundle --format=esm --define:process.env.NODE_ENV='\"development\"' --watch",
    …
  },
然后使用 npm run dev:worker 启动您的 worker 监视器,继续前进。太激动了!我们的应用程序现在有一个在访问页面时安装的 worker。我们很快就会注册它 😀。
app/utils.ts
现在让我们在 utils.ts 中添加一些实用程序函数,这些函数将帮助我们从客户端处理服务工作者和推送通知注册。
getDomain 将帮助我们在本地开发时将 localhost:3000 设置为我们的打开器 URL。这使得测试我们的软件成为可能。
export function getDomain() {
  return process.env.NODE_ENV === "development"
    ? "http// localhost:3000"
: process.env.DEFAULT_URL;
这是我们将从 entry.client.tsx 调用的函数,以注册我们的服务工作者。
export function registerServiceWorker() {
  return navigator.serviceWorker
    .register("/entry.worker.js")
    .then(function (registration) {
      return registration;
    });
}
askPermission 是我们将从设置 UI 调用的函数。您可以在应用程序的任何地方使用它,提供给某人订阅通知的能力。
export function askPermission() {
  return new Promise((resolve, reject) => {
    const permissionResult = Notification.requestPermission(function (result) {
      resolve(result);
    });

    if (permissionResult) {
      permissionResult.then(resolve, reject);
    }
  }).then((permissionResult) => {
    if (permissionResult !== "granted") {
      throw new Error("We weren't granted permission.");
    }
  });
}
subscribeUserToPush 是我们将从设置 UI 调用的另一个函数,在请求通知权限之后立即调用。它将使用订阅发布到我们的订阅路由。我从其他一些文档中完全复制了这个。我认为是 MDN。
export async function subscribeUserToPush() {
  const registration =
    await navigator.serviceWorker.register("/entry.worker.js");
  const subscribeOptions = {
    userVisibleOnly: true,
    endpoint: "/subscription",
    applicationServerKey:
      "BDXxzSsmZeHrm4_sqzQcX2lGBscHAiIP4rO0E1vPmkZbuZBnmCDhwSjJETCpz8Zu4FAkWVndaaqGkfyQQhvuHoQ",
  };
  const subscription =
    await registration.pushManager.subscribe(subscribeOptions);
  await fetch("/subscription/", {
    method: "POST",
    headers: {
      "Content-Type": "application/json",
    },
    body: JSON.stringify({
      type: "subscribe",
      subscription,
    }),
  });
  return subscription;
}
最后,我们的英雄,unsubscribeUserFromPush,它也击中了我们的订阅端点,但是使用了一个退订发布。您还将在设置 UI 中包含此功能,并且您希望在应用程序的任何地方提供给某人取消订阅推送的能力。
export async function unsubscribeUserFromPush() {
  return navigator.serviceWorker.ready.then(async function (registration) {
    const subscription = await registration.pushManager.getSubscription();
    await subscription?.unsubscribe();

    return fetch("/push/", {
      method: "post",
      headers: {
        "Content-type": "application/json",
      },
      body: JSON.stringify({
        type: "unsubscribe",
        subscription: subscription,
      }),
    });
  });
}
app/routes/manifest[.]webmanifest.ts
当您深入研究服务工作者时,这也是添加清单的好时机,这将改善将您的 Web 应用程序安装到主屏幕上的体验(这是在 iPhone 上使用 Web 推送的要求)。我在这里包含了基础知识,但一定要查看 MDN 上的所有选项。 您可以做很酷的事情,比如添加将用作预览的应用程序截图,可以从应用程序图标打开的快捷方式等。
import { json } from "@remix-run/node";

export const loader = async () => {
  return json(
    {
      short_name: "Example",
      name: "Bocoup Example app",
      description: "An installable app to teach you about installable apps.",
      categories: ["web development", "learning"],
      display: "standalone",
      background_color: "#f1f5f9",
      orientation: "portrait",
      theme_color: "#8b5cf6",
      start_url: "/f",
      screenshots: [], // 推荐添加一些这些
      shortcuts: [], // 和这些
      icons: [], // 和这些
    },
    {
      headers: {
        "Cache-Control": "public, max-age=600",
        "Content-Type": "application/manifest+json",
      },
    },
  );
};
app/routes/subscription.ts
接下来,让我们创建我们的资源路由 来接收来自 UI 的订阅和退订请求。资源路由是 Remix 的术语,用于不导出任何 UI 的路由。
这必须在设置 UI 的单独文件中,以便我们的 Web 推送代码不会被捆绑到客户端。
import { json, type ActionFunction } from "@remix-run/node";
import webpush from "web-push";

import {
  createSubscription,
  deleteSubscription,
} from "~/models/subscription.server";
import { requireUserId } from "~/session.server";

webpush.setVapidDetails(
  "mailto:example@example.com", // 为您的联系信息更改此信息
  process.env.VAPID_PUBLIC_KEY,
  process.env.VAPID_PRIVATE_KEY,
);

export const action: ActionFunction = async ({ request }) => {
  const userId = await requireUserId(request);
  const body = await request.json();
  const { type, endpoint } = body;

  switch (type) {
    case "subscribe":
      await createSubscription({
        userId,
        subscription: body.subscription,
      });
      return json(body.subscription, {
        status: 201,
      });
    case "unsubscribe":
      await deleteSubscription({
        userId,
        endpoint,
      });
      return json(true, {
        status: 200,
      });
  }

  return null;
};
app/routes/settings.tsx
最后,让我们构建我们的设置页面,其中包含告知用户他们当前订阅状态的 UI,并更改该状态。
这是一个长文件,您可能希望根据应用程序进行大量修改,所以我将不会逐步介绍。但是,如果您按照使用 remix 模板的这个演练进行操作,并希望将 UI 复制/粘贴到您的实现中,那么请继续:
import {
  CheckCircleIcon,
  ExclamationTriangleIcon,
  InformationCircleIcon,
} from "@heroicons/react/20/solid";
import { LoaderFunctionArgs, json } from "@remix-run/node";
import { useEffect, useState } from "react";

import { getSubscriptions } from "~/models/subscription.server";
import { requireUserId } from "~/session.server";
import {
  askPermission,
  subscribeUserToPush,
  unsubscribeUserFromPush,
} from "~/utils";

export const loader = async ({ request }: LoaderFunctionArgs) => {
  const userId = await requireUserId(request);
  const subscriptions = await getSubscriptions({ userId });

  return json({ subscriptions });
};

export default function SettingsPage() {
  const [subscription, setSubscription] = useState<PushSubscription | null>(
    null,
  );
  const [notifications, setNotications] = useState(false);

  // 检查通知和服务工作者注册是否受支持
  // 这样我们就可以告诉 UI 如果它们不受支持
  useEffect(() => {
    if (typeof window !== "undefined" && "Notification" in window) {
      setNotications(true);
    }
    if (navigator) {
      navigator.serviceWorker.ready.then(async function (registration) {
        registration.pushManager.getSubscription().then((subscription) => {
          setSubscription(subscription);
        });
      });
    }
  }, [notifications]);

  return (
    <div className="bg-white shadow p-4 space-y-8 w-full max-w-[700px] md:mx-auto">
      {notifications ? (
        <div>
          {subscription ? (
            <div className="rounded-md bg-green-50 p-4">
              <div className="flex">
                <div className="flex-shrink-0">
                  <CheckCircleIcon
                    className="h-5 w-5 text-green-400"
                    aria-hidden="true"
                  />
                </div>
                <div className="ml-3">
                  <h3 className="text-sm font-medium text-green-800">
                    通知
                  </h3>
                  <div className="mt-2 text-sm text-green-700">
                    <p>此设备已开启通知。</p>
                    <button
                      className="rounded-md bg-green-200 mt-2 px-2 py-1.5 text-sm font-medium text-green-800 hover:bg-green-100 focus:outline-none focus:ring-2 focus:ring-green-600 focus:ring-offset-2 focus:ring-offset-green-50"
                      onClick={async () => {
                        await unsubscribeUserFromPush();
                        setSubscription(null);
                      }}
                    >
                      关闭推送通知
                    </button>
                  </div>
                </div>
              </div>
            </div>
          ) : (
            <div>
              <div className="rounded-md bg-yellow-50 p-4">
                <div className="flex">
                  <div className="flex-shrink-0">
                    <ExclamationTriangleIcon
                      className="h-5 w-5 text-yellow-400"
                      aria-hidden="true"
                    />
                  </div>
                  <div className="ml-3">
                    <h3 className="text-sm font-medium text-yellow-800">
                      通知
                    </h3>
                    <div className="mt-2 text-sm text-yellow-700">
                      <p>此设备尚未开启通知。</p>
                    </div>
                    <div className="mt-6">
                      <button
                        className```jsx
                        className="rounded-md bg-yellow-200 px-2 py-1.5 text-sm font-medium text-yellow-800 hover:bg-yellow-100 focus:outline-none focus:ring-2 focus:ring-yellow-600 focus:ring-offset-2 focus:ring-offset-yellow-50"
                        onClick={async () => {
                          await askPermission();
                          const subscription = await subscribeUserToPush();
                          setSubscription(subscription);
                        }}
                      >
                        开启推送通知
                      </button>
                    </div>
                  </div>
                </div>
              </div>
            </div>
          )}
        </div>
      ) : (
        <div className="rounded-md bg-blue-50 p-4">
          <div className="flex gap-2">
            <div className="flex-shrink-0">
              <InformationCircleIcon
                className="h-5 w-5 text-blue-400"
                aria-hidden="true"
              />
            </div>
            <p className="text-sm text-blue-700">
              此浏览器不支持通知。如果您将此网站添加到主屏幕,可以启用它们。您也可以尝试使用不同的浏览器。
            </p>
          </div>
        </div>
      )}

      ...
    </div>
  );
}